
Add & Replace Files Action
The Add & Replace Files action allows for adding file(s) into a designated folder on the target system. You can choose from a list of target client folders. By default, the Application Directory is where the designated files will be placed.
Folders can be pathed relative to the target client folder by setting the subdirectories property.
Files can be added to the AppLife Package list by clicking the Add files button on the right of the list or by selecting the context menu item Add File(s). These files are added to the AppLife Package during the package build.
The files that are designated must be present for this action to be valid.
Prepare Stage
During the prepare stage, this action verifies permissions to the target folder.
Execute Stage
Makes a copy of the files that are going to be replaced on the client computer, then adds and replaces the defined list of files on the client.
Cleanup Stage
Removes the backup copies that were made during the execute stage.
Rollback Stage
Attempts to copy the files that were backed up in the execute stage back to their original location.
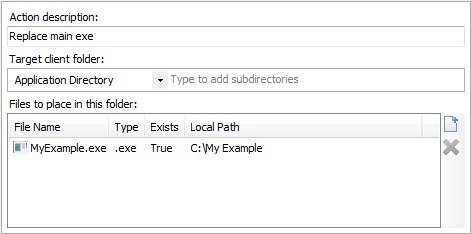
Action description – Descriptive text that can be used to identify this particular action in the Actions list.
Target client folder – The folder on the client to place the files in the file list.
Subdirectories – The directory below the designated client root folder to place the files in the file list.
Files to place in this folder – A collection of files that are to be added or replaced on the client in the defined folder. Files that are added to the list must be present for the action to be valid.