
Authoring Custom Actions
From within your custom action, you can call the OnProgressChanged method. This method raises a progress changed event that affects the progress indication on the Update user interface. Use this method to report progress between 0 and 100% of your custom action.
A Custom Action Builder class allows you to control how your action interacts with the AppLife Builder application and the update build process. Custom Action Builders are not required in order to create and implement custom actions. For most situations, and especially actions that will be used only once, the default Action Builder will provide all that is needed. When you have authored an action that is intended for extensive use, or to be used by other developers, creating a custom action builder allows you provide a more robust and intuitive interaction with AppLife Builder.
The reasons you will implement a Custom Action Builder are:
A Custom Action Builder is a class that inherits from the Kjs.AppLife.Update.Engine.Core.Design.ActionBuilder class. This class is located in the Kjs.AppLife.Update.Engine.Core.Design.dll. Refer to the F1 help for implementation details of the methods and properties of this class.
To link your custom action to its corresponding action builder, you add an ActionBuilderAttribute to your custom action class declaration that specifies your action builder.
From within the action builder, you can reference the action itself with the base class Action property.
Adding Validation
Overriding the ValidateActionCore method allows you to evaluate your action for a valid configuration. This method is called by AppLife Builder when the project is validated. To indicate that your action is not valid, simply add a string description to the errors parameter. This description will be used within the AppLife Builder user interface to indicate the action is invalid and prevent an update package from being built.


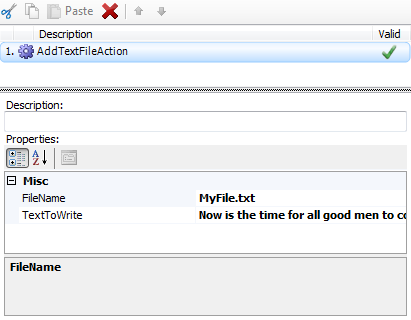
The default Action Builder utilizes a property grid to allow you to set the public properties of your custom action.
You can implement your own interface by creating a .Net control or user control.
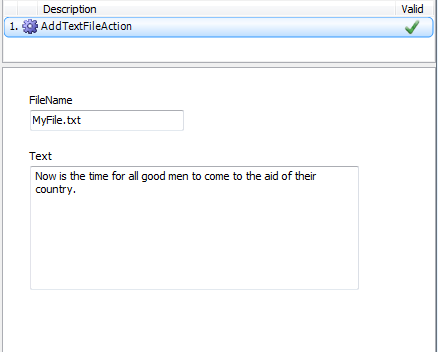
The control needs to derive from System.Windows.Forms.Control. You should implement a property within your control that allows setting a reference to your Custom Action Builder from outside the user control. This reference will provide all the programmatic access you need from the user control code to interact with your action and AppLife Builder.
The ActionBuilder’s Action property lets you change the state of the action as the user interface elements are manipulated.
AppLife Builder is interested in knowing when the actions within the project have changed and when the actions become valid and invalid. When your user control changes action property values, you should call the SetActionDirty method of the Action Builder. Additionally, when the user control changes values that could affect the validation state of your custom action, you should call the ValidateAction method of the Action Builder.
To connect your custom editor to your action, you override the StartEditingAction method and use the IWindowsFormsActionEditorService to show your custom control in place of the default editor. Use F1 help on this method for additional assistance and an example of how this is performed.
Changing the Action Name and Icon
When you create a custom action, AppLife Builder uses the class name and a default icon to display your action within the AppLife Builder action list. You can change this behavior by setting the DisplayText and Image properties of your custom action builder.
Build Actions
Using a custom action builder, you can perform operations in a pre and post build action. These events occur before and after an update package is built. To use these events for special processing, you override the PrepareForBuild method and/or the CleanupAfterBuild method. Both methods have access to a Build Context object. Using the Build Context object, you can write to the build log by using the Log property. You also can access the project build folder using the BuildDirectory property.
Note: Custom Actions, Custom Builders and Custom Editors do not have to be in the same assembly. The assembly that contains your Custom Actions is included in any update package that utilizes those actions, as your update execution logic resides there. Builders and editors are not used during the update process on the target client. If your builders and editors are in the same assembly as your actions and they significantly increase the size of the assembly, you might consider placing them in a separate assembly to decrease the update package size.
Custom Action classes are compiled into your custom action assemblies. You can add these custom assemblies to individual projects, making the actions contained in them available to specific projects. Alternatively you can place the assemblies into the global custom actions folder, making the actions available to all projects.
Adding to a Project
Open your project in AppLife Builder. Under the Tools menu, click the Custom Actions menu item. The Custom Actions form displays the assemblies that are available to the project. To add a new assembly, click the Add an assembly button and browse to your assembly. When an assembly is added, Actions within the assembly will appear in the AppLife Builder Actions palette. You can control the location and display within the actions palette using attributes on your custom actions. See the palette section for more information.
Adding to the Custom Actions Folder
Placing your custom action assemblies within AppLifeUpdateInstallFolder\MakeUpdate\CustomActions folder makes your actions available to all projects. The default location of this folder is C:\Program Files\AppLife Update\MakeUpdate\CustomActions. Assemblies in this folder are visible from the Custom Actions form and the actions will be in the palette.
Actions within custom action assemblies are placed in the Action palettes within AppLife Builder. Users can then add these actions to the update projects by interacting with the palette, just as the built in actions are added. Custom Action developers can control the placement within the action palettes by placing attributes on the custom action class declaration.
By default, all custom actions are placed in a palette labeled Misc. Actions are named by their class name and they have a standard action icon.

To control the display and placement, there are three attributes that you place on your action class declaration.
System.ComponentModel.DisplayNameAttribute
System.ComponentModel.DescriptionAttribute
System.Drawing.ToolboxBitmapAttribute
Use the DisplayName attribute to change the display name of the action. Use the Description attribute to change the tooltip on the action. Use the ToolboxBitmap attribute to change the icon for the action.
Using these attributes…
[DisplayName("Add Text File"), Category("Sample Actions")]
[Description("This is a sample custom action")]
[ToolboxBitmap(@"P:\~Scratch\RadialChartHS.png")]
public class AddTextFileAction : UpdateAction
Causes the action to be displayed…

AppLife AppLife Builder loads each custom action assembly that is being used in a project. To replace the assemblies in their current location, you will need to close AppLife Builder. When you re-launch AppLife Builder, custom action assemblies in the same location with the same or newer assembly version numbers will be automatically loaded.