
Executing Packages
Updates are discovered, downloaded and verified to be intact and from the original publisher. Only then can an update be executed. To execute an update package, the Update Controller component initiates the process by communicating with all instances of the hosting application and requesting a shutdown. Implementers can handle the UpdateStarted event of the Update Controller to perform any necessary actions prior to shutdown, such as prompting to save work. The update can also be cancelled from that event. Once the instances have been shutdown, the initiating instance extracts and executes an Update Launcher.
The Update Launcher initiates the update process and then waits until the updating executable completes its work. After the update is complete, the hosting application is launched in its updated state.
AppLife Update can successfully update .Net applications that target the .Net Framework 4.0 or higher. The AppLife.Api package targets the .NET 5 framework and can be directly integrated into your .NET 5 applications. The Update Engine is still dependent on the .NET 4.x framework, and .NET 4.0 or greater must be present on the target system to apply an AppLife Update package.
When the host application is re-launched after an update is executed, you can choose to include the original command line arguments that were passed to the pre-update session. To do so, set the Update Controller property AutoCopyCommandLine to true. The default value is false.
If your organization uses an install creation program such as InstallShield or Wise, you might already be creating Microsoft Installer major upgrades, minor upgrades and patch files for your software. If this is the case, you can utilize the Execute Msi update action to launch your upgrade or patch during an update. You can define the exact command line parameters to pass into the msiexec.exe. When the package is downloaded, verified and executed, your patch will be automatically executed on the client computer.
Note: Microsoft Install Patches cannot be created directly within a Visual Studio Setup Project. You can create an installer patch using the Microsoft Installer SDK. More information can be found at http://msdn2.microsoft.com/en-us/library/aa372866.aspx
If your organization utilizes a custom executable to update your software, or your application requires very unique procedures in order to be updated, you can utilize AppLife Update to manage and distribute these updates. You can apply your custom patch using a Run Command Line Update Action during an update.
Note: Custom Actions within an AppLife Update action list might be a better alternative to the custom executable.
The AppLife Builder application can be used to define a list of actions that are to be executed on a client computer in order to update your software from one version to another. Actions such as replacing files, modifying registry keys, and registering COM components can be configured in a sequential manner to update your software. These actions are designed to address the most common update steps required for software applications. In addition, each action is architected to ensure a complete rollback should any update action fail. This prevents the client software from being placed in a comprised condition. If the built-in actions are not sufficient to update your software, you can easily create custom actions using C# or Vb.net. Your actions can then be added the list of actions to be executed when your software is updated.
When using an AppLife Update Action Lists, your updates are executed on client systems by the AppLife Update Engine. The operation of the AppLife Update Engine user interface is configurable within the host application code.
Configuration options for the AppLife Update Engine user interface include:
No User Interface
You can choose not to show this form at all during an update. This options allows you to silently update your application.
Immediate Close
By default, the AppLife Update Engine user interface shows an “update complete” message and requires the user to click a close button to complete the update. Upon clicking the close button, the newly updated application restarts. You can choose not to require the user to click a close button and have the update user interface immediately close upon completion of applying the update.
No Restart
You can configure the AppLife Update Engine interface to not restart the application upon completion of the update.
No Shutdown
By default, when an update is applied, the application hosting the Update Controller is shutdown so that its assembly can be replaced during the update process. In some implementations, this is not desired. You can configure your update process to not shutdown the hosting application during an update process.
These options can be combined for custom configurations. The ApplyUpdate and the UpdateInteractive methods of the Update Controller provide overrides that allow you to configure these options.
When an update is applied, inter-process communication takes place between all running processes with an instantiated Update Controller. When an update is executed, an attempt is made to shutdown any process with an Update Controller configured with the same ApplicationID as the initiating controller. In each of these processes, the UpdateStarted event is first raised to allow the implementer to perform any necessary work prior to the shutdown attempt. From this event the implementer can control the behavior of the update process.
1. Inspect the physical path of the instantiating host assembly and use this information to support independent side-by-side application updating.
2. Cancel the update process currently in progress.
3. Ignore the update process, and prevent the current instance from being shut down, without canceling the entire update process.
4. Pass from the initiating application instance to all other instances custom data that can be used to determine the proper behavior to take. Set the UpdateController.CustomIpcData property and investigate the UpdateStarted Event Argument’s custom data property.
Note: When the application update process is configured for No Shutdown by using the ApplyUpdateOptions.NoShutdown parameter, only the initiating update process will not shutdown. The inter-process communication still occurs and the UpdateStarted event is raised on all other instances. If your implementation should prevent other processes from shutting down, handle the UpdateStarted event and set up your desired behavior.
Disabling IPC
Update Controller Inter-Process Communications can be disabled by setting the Update Controller DisableControllerIPC property to true.
Shared Properties can be defined within the host application and passed into the update process as the update is initiated. This allows you to pass client-specific information into the update process and use this information to control the behaviors of update actions. Shared Properties can be used as part of Update Action conditional expressions as well as within dynamic actions and custom actions. For more information, reference the AppLife Update API documentation from the Help menu.
The user interface that is displayed to the user while an update is being applied can be customized to match the visual appearance of your application. For customers that would like to add more in-depth visual customizations than are possible through the Project Properties options (adorn a logo image and modify the window title), the standard user interface can be completely replaced with your own customized UI by implementing the Kjs.AppLife.Update.Engine.Core.IUpdateUI interface.
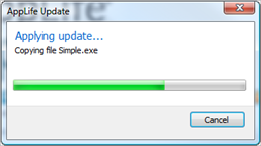
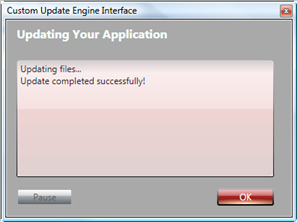
(Left Image – Default User Interface, Right Image – Example Customized User Interface)
To replace the Update Engine UI, you will create a new .Net assembly (.dll or .exe), reference the AppLife Update Core assembly and include one class that implements the IUpdateUI interface. This class will be called by the Update Engine and should display and update the user interface as the interface methods are called by the AppLife Update engine.
The assembly can then be imported into your AppLife application, after which all future update packages built by the project will include the new customized user interface.
IUpdateUI Operations
1. As the update engine starts, the IUpdateUI.Open() method is called. In this method you should create and show your customized user interface. Your user interface should remain visible until the IUpdateUI.Finish method is called.
2. As the update progresses, the IUpdateUI.Update() method is repeatedly called. This method has parameters that provide information about the current state and progress of the executing update. This information can be used to provide visual feedback within your customized user interface.
3. When the update is finished, the IUpdateUI.Finish() method is called. This method has parameters that indicate the condition of the update. If an error occurs during the update, error information is provided through the error parameter. The customized user interface can be safely closed anytime after this method is called, but should not be closed before this method call.
4. If the ApplyUpdateOptions.AutoClose option is set by the host application code that initiated the update process, the IUpdateUI.Close() method is called immediately following the Finish method. If this method is called, it is expected that your custom user interface be immediately closed. Note: If you utilize a System.Windows.Forms.Form class and implement the IUpdateUI interface, this method is already present.
5. Some update actions request a Yes/No response from the user. To support this, your customized user interface must implement the IUpdateUI.ShowYesNoPrompt() method.
6. As your customized user interface is closed, the update engine is notified by your class raising the IUpdateUI.Closed event. Note: If you utilize a System.Windows.Forms.Form class and implement the IUpdateUI interface, this event is already present and is raised when the form is closed.
7. Your custom user interface can optionally support canceling an update, as well as pause and resume features by raising the IUpdateUI.RequestCancel, IUpdateUI.RequestPause, or IUpdateUI.RequestResume events.
A sample implementation of a custom update engine user interface is available within the Custom Forms Quick Start example.
You can identify the first time your application restarts after an update have been applied by checking the state of the IsFirstRun property of the Update Controller. This value will be true if this is the first start after an update.
Note: Is First Run is user specific. This value should only be relied upon if the user initiating the update will be the user that first restarts the application.
The results of the last update to be applied can be accessed using the ReadLastUpdateInformation method of the Update Controller. This method returns the following information about the last update to be applied:
•Completed Time
The time that the update completed execution
•Error Text
If the last update ended in an error condition, the text of the error can be read.
•Log Path
The path to the action list log file that was created by the update.
•Result
The final result of the update. Success, Failure, Cancellation.
•Starting Version
The software version that initiated the update
•Update Version
The update version that was applied.
The AppLife Update engine has been localized for the following cultures:
•English (en-us) – default
•Chinese – Traditional (zh-CHT)
•French (fr)
•German (de)
•Italian (it)
•Japanese (ja)
•Spanish (es)
When creating an update project, you can choose one or more languages to provide your update for. You can also supply culture specific release notes for each language selected.
Depending on the installed structure of your application, it is sometimes necessary for elevated user privileges to accomplish a software update. For example, a standard user cannot replace a file in the Program Files directory. In these circumstances it is necessary to elevate privileges to execute an update.
AppLife Update Windows Service
If you are using an AppLife Update action list to update your software, you can elevate privileges by configuring your software to use the AppLife Update Windows Service. This windows service runs under the context of the local system account.
To use the AppLife Update Windows Service:
1. Configure your application by setting the ElevationType property of your Update Controller to AppLifeUpdateService.
2. Add the AppLife Update Windows Service to your application installer. The merge module will install the service and register your application for use. Only registered applications can interact with the service.
When your application distributes the AppLife Update Windows Service and is properly configured to utilize the service, the update engine will execute your update packages under the security context of the Local System. The AppLife Update engine user interface communicates with the service to provide your users progress indication as the service executes your update package.
Applications that utilize the AppLife Update Windows Service will not be prompted by the Windows User Account Control (UAC) when an update is executed.
All of the built-in update actions perform identity impersonation to ensure that any update activity that targets the current user profile will be properly executed by the AppLife Update Windows Service. Custom actions that you create can gain access to the Windows Identity of the user who initiated the update using the Target Application Identity information on the Update Context object. More information on this topic is available in the API Reference.
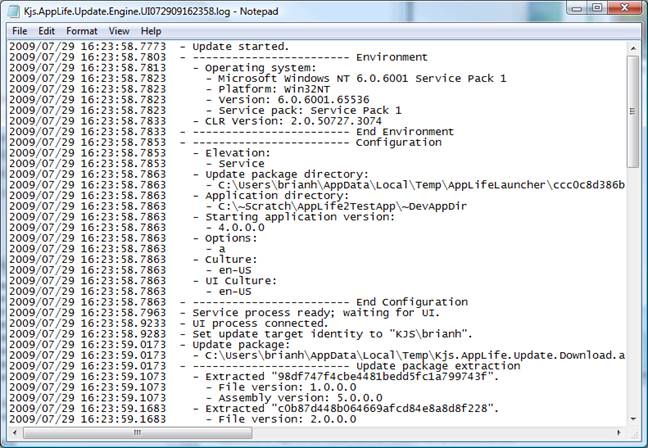
During an update, a log file is created that documents the actions that are performed. This log file is used to diagnose update execution errors. The log file is located in the current user’s local application data folder.
Windows 10:
C:\Users\[user]\AppData\Local\Kjs.AppLife.Update
Elevated Updates
Updates that use the AppLife Update Windows Service are executed by the Local System account. The Local Application Data folder for the Local System Account is located in the profile for the Local System Account. After the update completes, the log file is copied to the initiating users log location.
Windows 10: C:\Windows\System32\config\systemprofile\AppData\Local\Kjs.AppLife.Update
When AppLife downloads and executes a maintenance package, a working directory is created in a designated location on a deployed client. Depending on the configuration, this is usually in a user’s temp directory. Sometimes it is necessary to define a specific working directory for a machine. AppLife provides a mechanism to accomplish this.
Add a key to the 64 bit registry. HKLM\SOFTWARE\KineticJump\AppLifeUpdate\ApplicationSettings\{Your Application ID GUID}
Add an UpdatePackageDirectoryRoot string value.
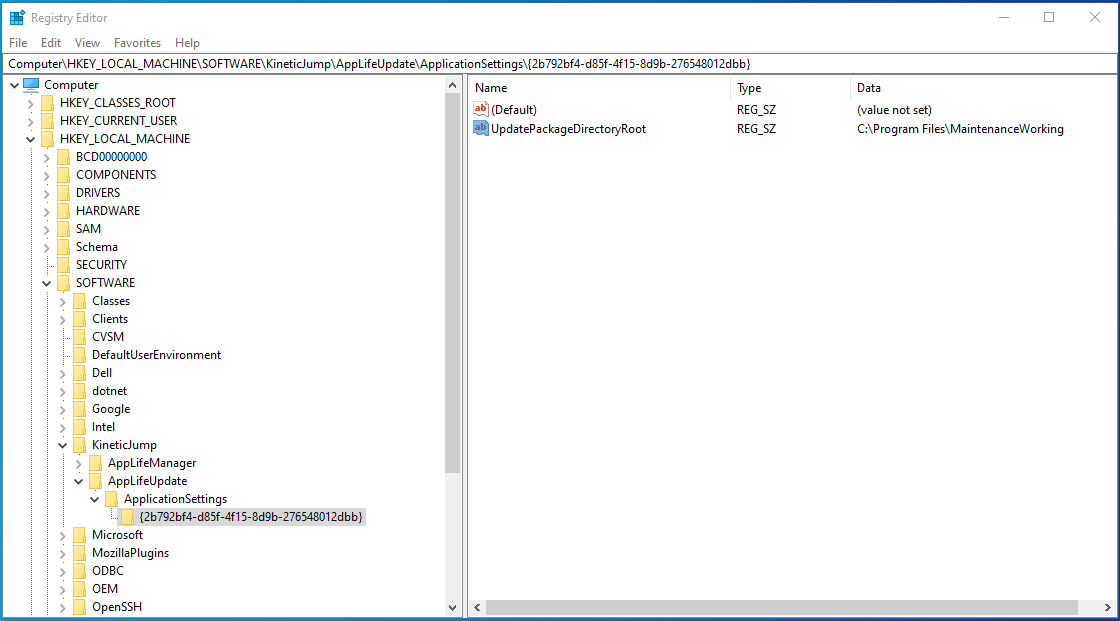
If a value exists for an application, the AppLife Engine and Launcher will utilize the specified directory. The Windows Identity of the host process will need to have both write and execute permissions to the directory.
You can define your own logging location for your application by adding the appropriate registry entries described below. With a custom log location defined, your application will always log to the defined folder whether the service is used or not. If your custom logging folder doesn’t exist, AppLife Update will attempt to create it. If the folder can’t be created, or the current user does not have permissions to write there, the log will be written to the default AppLife Update logging location.
Defining your log location:
Add a registry key for your application ID under the HKLM\SOFTWARE\KineticJump\AppLifeUpdate\ApplicationSettings registry key and add a LogDirectory String value that contains the path to your log folder.
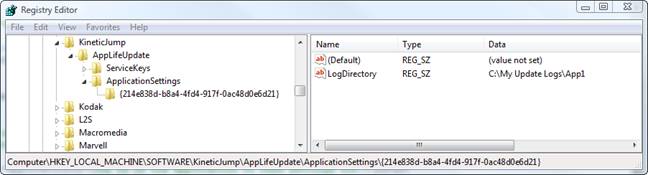
NOTE: This is the 64 bit Registry on 64 bit operating systems.
Update execution logging can be disabled for a designated application. To disable logging, add a registry value:
HKLM\SOFTWARE\KineticJump\AppLifeUpdate\ApplicationSettings\ {ApplicationID}
DisableLogging (DWORD)
If this value is present with a value of 1, logging will be disabled for the designated application id.
Using the AppLife Update Controller, you can programmatically access update history for your application. Update history includes:
•The initial version number being updated
•The version of the update package
•The start and end time of the update
•The update result
•The type of elevation used
•The log file path
•The summary text
•The custom data
Use this information for troubleshooting update issues and to provide access to update history for your users.
The Update Controller has a static method named GetUpdateHistory that will return a collection of LoggedUpdate classes. Please see AppLife Update API Reference from the help menu for more information.
Windows Operating systems have 64 bit versions. Special consideration must be given when installing and updating software on 64 bit operating systems. These 64 bit operating systems have a 32 bit sub-system for compatibility with 32 bit software. AppLife Update provides update authors the ability to specifically target the 32-bit sub-system registry and file system. Update authors can also explicitly register 32 bit and 64 bit COM assemblies.
Applications built to execute in 64-bit mode will automatically integrate with the 64-bit system, and 32-bit applications will automatically interact with the 32-bit sub-system. Installers are not as straightforward and care must be taken to ensure applications operate as expected when installed on a 64-bit Windows operating system.
With AppLife Update, any action configured to target an x86 sub-system on 64-bit operating systems will also target the equivalent location on 32-bit operating systems.
The AppLife Update Controller is completely compatible with WPF applications. Though the built-in user interface forms that are in the Update Controller are Windows Forms based, they can still be shown from WPF applications. In addition, you can completely customize your user interface using WPF XAML, just as you can create custom winforms user interfaces.
Integration Points to consider with WPF applications
1. The Update Controller is Disposable
The controller class is disposable and must be disposed when you are done using it. Placing a controller on a WinForms designer adds the control to the form container, and the container ensures that the controller is disposed when the form is closed. In WPF this won’t be the case.
If you intend to utilize the built-in Inter-process communications(IPC) of the update controller to coordinate the shutdown of multiple instances, then instantiate your controller and keep it instantiated throughout the lifetime of your main WPF Window. Ensure the control is disposed as the Window closes.
2. Setting the Owning Form
To utilize the built-in user interface for updating, the Update Controller methods expect a IWin32Window class for the owner parameters. If you don’t set an owner, the dialogs that the Update Controller displays will not be properly positioned. You can easily wrap a WPF Window using this simple wrapper class, allowing you to pass the WPF Window to the Update Controller properties.
private class WindowWrapper : System.Windows.Forms.IWin32Window {
private System.Windows.Interop.WindowInteropHelper mHelper;
public WindowWrapper(Window window) {
if(window != null) {
mHelper = new System.Windows.Interop.WindowInteropHelper(window);
}
}
public IntPtr Handle {
get {
if(mHelper == null) {
return IntPtr.Zero;
} else {
return mHelper.Handle;
}
}
}
}
Example Usage:
mController.UpdateInteractive(new WindowWrapper(this));
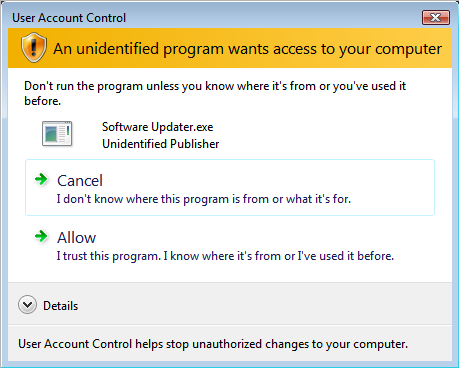
On Windows 7 and higher, privileged users execute applications with a limited security token. When a privileged user attempts to perform an action that required higher privileges, they are prompted for confirmation (Limited users are prompted for credentials). If your update package requires higher credentials to complete and have chosen not to deploy and use the AppLife Update Windows Service for elevation, you can utilize the UAC to attempt elevation.
The default behavior of the Update Controller is to initiate an update using the same privileges as the current user. You can set the Update Controller to utilize the UAC or the AppLife Update Windows Service for permissions elevation using the ElevationType property.
If you choose the UAC, the update is launched from an unknown publisher:
You can optionally code sign the launcher for your update project. The launcher is compiled by AppLife Builder and cannot be used with any other project than the one that created it. Code signing the launcher allows you to identify your organization as the publisher of the update that your users will apply.
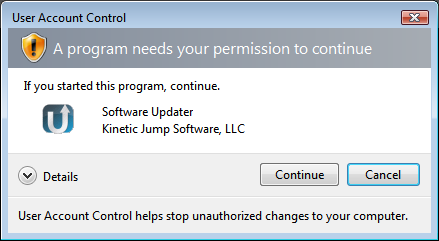
To code sign your launcher, choose the UAC Launcher menu item from the Tools menu.
1. Using the dialog, you can optionally specify an icon for your launcher, then save the executable file to your file system. Keep track of the saved exe file as it is the only file that can be imported back into the AppLife application.
2. Code sign the saved executable using your organizations certificate. If you do not have a certificate, there are many vendors who can provide this.
www.verisign.com
www.thawte.com
3. Import the code signed executable back into your AppLife application.
Once imported, future updates will properly identify your organization as the publisher of the update.