
Simple WPF Quick Start
The simple WPF quick start demonstrates how to utilize AppLife Update within a WPF application. This example utilizes the WPF UpdateDisplay control.
1. Add an UpdateDisplay Control to the Main Window of the WPF Application.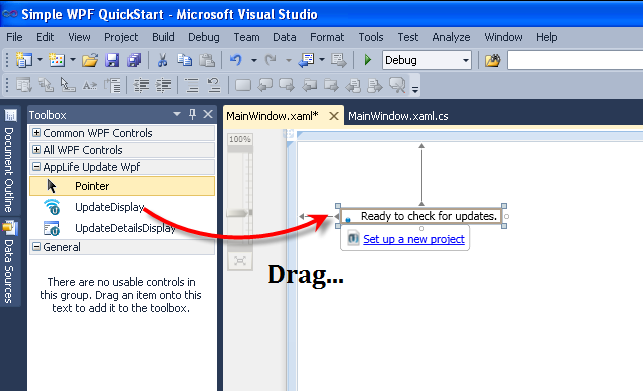
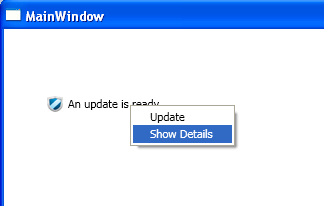
Drag and drop an UpdateDisplay control from the WPF toolbox in Visual Studio onto the application’s main window. This control can be found on the AppLife Update tab. The UpdateDisplay control provides an in-line asynchronous check for updates, download, and user notification. The control also has a details pop-up pane. You can use this control from the main window of an application to completely manage the update process. There are many customizations available through the properties of this control. When an UpdateDisplay control is placed on a window, a reference to the Kjs.AppLife.Update.Wpf.dll and Kjs.AppLife.Update.Controller.dll is added to the Visual Studio project. In addition, a “kjs” namespace is declared on the window.
See the User Experience Options topic for information on the other built-in update user experiences available.
Note: Visual Studio Express Editions will not have AppLife Update controls pre-populated in the toolbox. These controls can be manually added to the toolbox, and then dragged onto your form. To manually add the controls, select to Choose Items… from the toolbox context menu, then select the UpdateDisplay control from the WPF Components tab.
2. Set up a new AppLife Update project.
Click the control’s Set up a new project adorner.

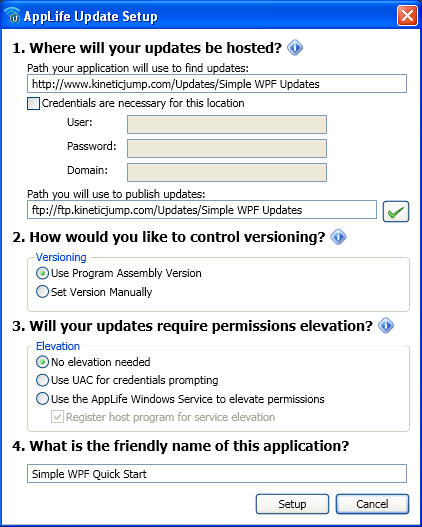
To set up a new project, specify:
1. Where will your updates be hosted?
2. How would you like to control versioning?
3. Will your updates require permissions elevation?
You can utilize any http, ftp, UNC or file path location to host your updates. There are no server requirements, except that your application must be able to connect to this location.
Note: It is common to use a different path to publish updates. Ftp is commonly used to publish, while http is used to retrieve updates.
By using Assembly Version for versioning, the host executable assembly version determines the client version, and is used to determine which updates are available for the application. By selecting to set the version manually, the Version property of the Update Controller will determine the version of the client. Using manual versioning is often used in customized updating implementations to provide flexibility. For most .Net applications, assembly versioning is the best choice.
The permissions that your update process requires is determined by where the application is installed on the deployed system, and the security posture of the deployed system environment. Applications that are installed into the Program Files directory and started by a user with limited permissions will not be able to be updated without permissions elevation. You can choose no elevation, UAC elevation, or elevation using the AppLife Update Windows Service. The AppLife Update Windows Service can securely elevate the permissions of the update process to run as the local system account, allowing limited users to update your software without administrative support. If you utilize the Windows Service, this service will need to be deployed with your application. Administrative permissions are required for initial installation of the service as well as the registration of each application that will use it. See deploying the AppLife Update Windows Service for more information.
3. Build an Update
When you complete the setup, a new AppLife Update project is created, and the Update Controller on the application main form is synchronized with this project. This can be confirmed by comparing the Application ID, Public Key, and Update Location properties of the Update Controller with the project settings. These settings must match in order for your application to successfully apply updates created by this project.
As this project was created, an Add & Replace Files action was added to the project for you. This update action will replace the host executable, and any Visual Studio project referenced assemblies from the solution as the update executes on deployed systems. You can add additional files to this action, or use any other update action in the Action palette by modifying the action list.
To build an Update:
a. Build the executable in Visual Studio. Don’t forget to set the proper version number before building the executable. Make Update will detect the assembly version of the host executable (your application), and this will determine the version number of the update being created.
b. In Make Update, Click the Create an Update button…
This will launch the create update wizard.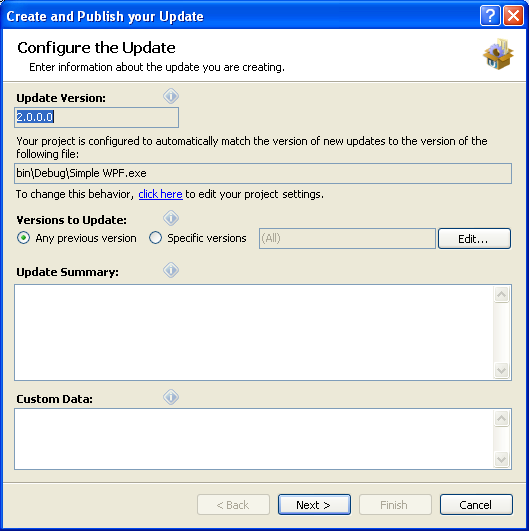
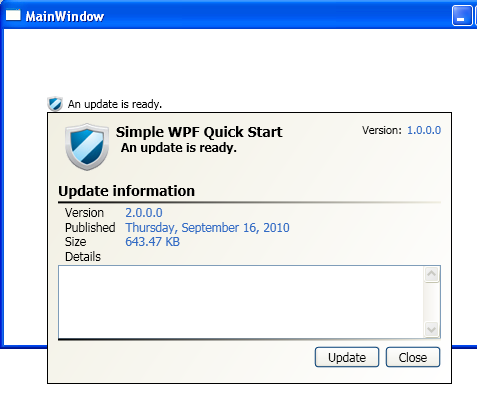
The update version being created is 2.0.0.0. This is detected from the host executable.
This update is available for any previous version of this application. If the actions in the update action list are configured to expect a specific version, you can change the Versions to Update to target a specific version. You can also target all versions greater than a specific version, or a discrete list of previous versions.
Summary text describing the update can be provided. This text will be displayed by the update user experience and is also available through the Update Controller API.
Custom Data provides a method to pass information to your update process. Information provided here is available to your application through the Update Controller API.
Note: The list of versions to update, summary text, and custom data can be modified after an update has been created by managing the update location that the update is published to.
Click Next>
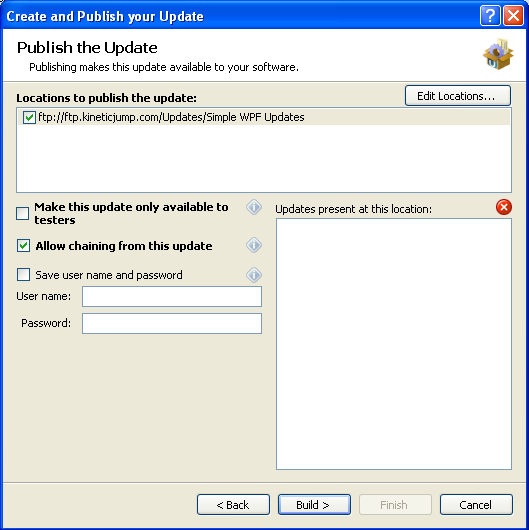
On the next page, you can select from one or more update locations to publish the update to. If your update location requires credentials, you can provide them here, or be prompted as the update is actually transferred. When updates are present at the location, they are displayed in the list on the right.
The update can be designated as a test update by checking the Make this update only available to testers checkbox. When this box is checked, clients who will discover this update must have a specific value in their app.config file. See Testing updates for more information. This value can be modified by managing the update location that the update is published to.
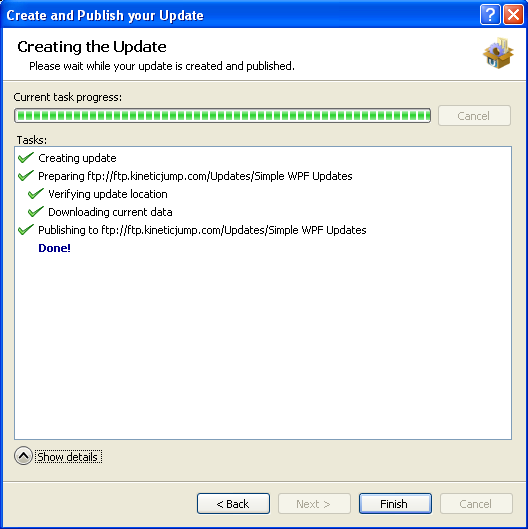
Click Build > to build and publish the new update.
4. Applying the New Update
The newly created update can now be used to update any previous version of the application to version 2.0.0.0. To test this, we’ll change the application version in Visual Studio back to version 1.0.0.0, build the application, and then run it.
a. Change the assembly version back to 1.0.0.0
b. Start debugging the application in Visual Studio.
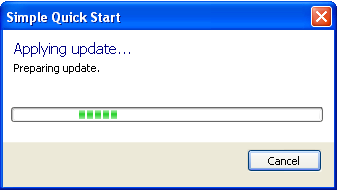
The update process is started automatically.

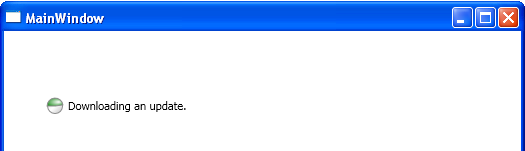
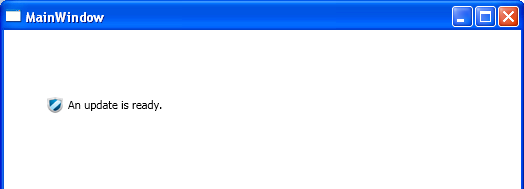
Applying the update…
The host application is closed and the AppLife Update engine performs the actions defined in the update action list.
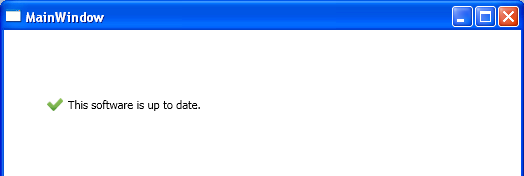
The update completes and the host application is restarted as version 2.0.0.0. An update check is performed, but this time the application is up-to-date.
The Custom Forms Quick Start walks through using the Update Controller API to create a completely customized user experience.
The Custom Actions Quick Start walks through creating completely custom update actions, allowing you to perform any updating activity during an update.